

Wednesday, August 19, 2009

DIY Day - $5 Kitchen Table Makeover

DIY Day @ ASPTL
I can't believe the summer is nearly over and I've only participated once before in Kimba's DIY Day! Hopefully I'll have some more projects to show off in the coming weeks so that I can join the party again.

So my project? A $5 makeover you say? What could it be...
A wrapping paper tabletop! Totally ingenious, I think!

Although when I googled it to see if I was the first person to come up with such brilliance, I discovered 'ol Martha had beat me to it. She has a funny way of doing that, hey? Below is her version, which I love. Note the little gift boxes on each place setting wrapped in the same paper as the table runner? Gorgeous...
Actually I probably shouldn't have even put that picture in, because it really puts my efforts to shame But I'm still pretty pleased with how well it turned out, how quick it was, and even better, how cheap it was!

The picture below was just after we painted the living room a month ago. I love this tablecloth, and now the colors go perfectly in this room. But in the process of painting, our plastic table top cover was ruined with paint splotches. So we've been without one for a few weeks. And in the meantime my tablecloth was not really holding up to the wear and tear of life with kids. Drip here, drip there, drip everywhere. So I was kind of feeling like I needed a tablecloth break for awhile. So I came up with this idea, and I think it will be a nice change. Although now I wish I would have gone with a bolder pattern, and perhaps something darker. But really, I can try that out in a month or so when I get bored of this one!
My disclaimer. Our tabletop is not in the greatest shape. It was the floor model at The Bay, so we got our table and hutch at a seriously discounted price ($500 for both. Solid oak, I think). So I am not at all concerned about damaging the table top, but for those of you who are, I might not recommend this project. Or at least use a different type of adhesive.

So you'll need a clean tabletop. Give 'er a good wipin' down before you proceed.
The three year old with binoculars is not a necessity, but always a nice touch!
Lay out your wrapping paper to make sure you have enough. I bought this roll at Hallmark. My table top is 4' acround. This package covers 20 Sq. Ft. I seriously only had millimeters on each end!
Get your handy dandy Vellum spray and start spraying (or whatever adhesive you use).
And please, please don't pay that much ($14.50) for a can. I didn't know. I bought it at a scrap booking store, only to find it at Zellers for 50% of what I paid!

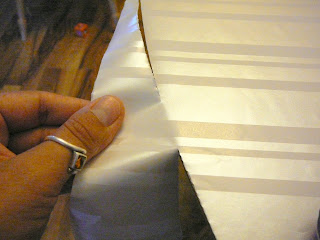
Smooth out any bubbles with your hand as you go.
Then once the wrapping paper is secured, start cutting with an Xacto knife. You'll see in the second picture here, pulling the paper taut really helps to get a smooth cut.
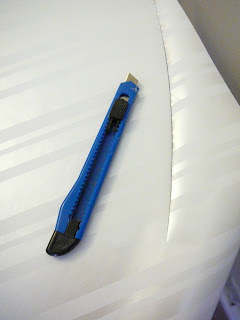
I also decided to do a strip around the lower part of the table top with the leftover scraps. It only took 5 pieces, and 10 minutes of cutting to do this bit. Again, I used Vellum spray.
(My word, is the floor ever dirty back there. Eeek!)
And voila, my "new" tabletop, that only cost me $5! It only took 30 minutes start to finish.
The bigger picture of our dining area.
Back to reality, I have to put a plastic cover over this. With kids, the milk would have been spilled, the applesauce sprayed (that actually took place last night!), the food flicked, or just your basic food disaster would have happened before I could even put my supplies away.
So there you have it. Cheap, simple, and a fun way to switch up your dining room.
Head on over to A Soft Place to Land to see some other great DIY-ness!

And this is an aside, but I picked up these adorable little tassels today for 50 cents each. Totally simple, but I think they are so sweet and look just right on my hutch!

Monday, August 17, 2009

Wife, Mommy, Homemaker...Student?

When you read my blog title, at the end you should hear a record being scratched and numerous people saying, "SAY WHAT?" Yup, its true, I'm starting school, again. This September. Be there...

Lets go back to the beginning shall we. I was 1.5 years out of high school and I had been working full time since graduating. It occurred to me that it was high time to go to College. So I did. I got me a nice chunk of student loan money from the government (Don't worry, I'm still smacking myself in the head for that one!), and off I went. Pretty gung ho I was. I went for1.5 years, non-stop. By the time I stopped, I only needed one more course and a practicum until I got my Social Services Diploma. But being the foolish 20-something that I was, I just stopped. Cold turkey. No looking back. Sigh...

Fast forward to 2007 (5 years later). I thought, "Hmm, what do I really need to finish that Diploma anyway?" When I found out it was really only two courses I thought, "What the heck was I thinking?" The reality was that I wasn't really thinking at the time. So I looked into it, and the college granted me permission to finish my Diploma (even though I was past the 5 year deadline). Nice folks those college types.

So starting in the Fall of 2007, I did a Psychology course by distance learning in the mornings before Abbi woke up, and sometimes even after she went to bed. It took me 5 months, and I ended up getting an A in the course. In the Spring of 2008, I started in on a 6 week, full-time practicum at a Foster Care agency. Child care was split between my cousin Ruth, and Rob's Mom. It was an incredible experience, and from that, I was hired on to work 2 days a week until I started my maternity leave with Gabe. Once I started working, I put Abbi in a daycare, which I think was a really great experience for her.

To be honest, at the time I really wasn't sure I would, could or should finish it. But thankfully common sense kicked in, and I pushed through. It was tricky with a two year old. Trying to focus and set aside time for my studies seemed nearly impossible some days. So now, as I think of starting all over again, I'm fairly intimidated at the thought (perhaps overwhelmed is a better word!). I'll be plugging away at this part time, and I also now have a second child on board. Wow.

The current "hot topics" around my house include things, such as; potty training, firetrucks, Barney, trains, Finding Nemo, and other random arguable topics that Abbi decides to bring up. My world view is coming from places like Barney (unfortunately a favorite around these parts), Super Why, Dora, Baby Einstein, Goodnight Moon, and Old MacDonald. So as you can see, I'm feeling a little like my brain has been fried by all this "kidness." I wouldn't trade this time for anything, it is so precious (Well, I wouldn't describe every day as "precious," but you get the idea!). But some days it really does your head in! Academia is not really on the forefront of my mind right now.

I had applied to UVIC's Bachelor of Social Work program late in 2008. Around the same time I also applied for a Metis & Non-Status Bursary through the Alberta government. Basically its grant money for Native people who could never qualify for Indian Status who are pursuing a degree in the Social Services field. So both of those applications were long gone, and I basically forgot about them. I found out in June that I did indeed get accepted to UVIC, and then in July I found out that I was granted the bursary! Wow! Both things caught me completely off guard. Most days I still can't believe it!

A prerequisite of getting into UVIC is completing three general elective courses. My Diploma is quite old at this point (6 years), so some of my courses no longer transfer. They wanted all this done by this upcoming September, as well as a 5 day course in Victoria two weeks from now. Um, yeah, not really happening in my current life space. So I have been granted a deferral until September 2010 when I will officially start the program.

In the meantime, I have to finish those three courses. I plan on doing them nights and weekends at a local college here in the city. I figure a classroom environment might be a better place for me to get my head around this school business again. Plus, the hours work pretty well around Rob's work schedule.

So there you have it. I'm feeling so incredibly blessed at this opportunity, and I know that things like this don't happen every day. So although it feels a bit soon, and a bit crazy, I feel its something I need to pursue. The hope is that I will be finishing up my degree around the same time that the kids would be starting school. Thus, allowing me to return to the work force with a fairly reasonable amount of education and training.

I figure this will likely affect my blogging regularity once I start my schooling. I do hope to still get to my garage sales, and do crazy rehab projects, but I know my mind will also be focussed elsewhere. So I am feeling a bit of a time crunch when it comes to finishing up some projects. My to-do list is taped up to my left. One item crossed off, far too many to go. One at a time I keep reminding myself. "One thing at a time..."

Sunday, August 16, 2009

My Plate Wall...Finally!

I posted this a few days ago now, but I'm also going to add it to Kimba's DIY Day. Pop on over and check it out, there is always so much inspiration...
DIY Day @ ASPTL

I can finally show the finished product of the plate wall. Its been something that I've been puttering on for weeks now. I've only actually been working on it for two days, but it seems like its taken forever to materialize. The idea came from the oh so brilliant Kimba. Basically people spend years trying to find plates of a similar color and pattern to make a display on their wall. Then it one day occurred to Kimba, why not just make them all the same color? And voila, the incredible spray painted plate wall was born. You can see the post here.

I decided I must have one. We have this wall in our living room that is just impossible. Such a weird shape with a cutout to the stairwell. Just not a space that you could hang your basic 4-sided frame. Nope, it needed something different, something with a little more pizzazz. This picture below is the wall pre-plateness.
Oh, and I needed it to be something cheap. This project cost me under $10! The plates were found at a number of different garage sales and thrift shops. Less than $1 for all of them. Then a can of Krylon gloss white, $5.89. Then I needed two additional plate hangers (I got 4 for free off of Earthcycle), which I picked up at Dollarama, $2. So my grand total was $8.89!

First things first...find some incredibly ugly plates, with good lines. Check.
Next, spray paint the heck out of them (2-3 coats). Check. Unfortunately I didn't take any pictures of this process, but I learned the hard way that a white gloss finish looks much better (and more fitting) than a matte finish. I used Krylon, which is quickly becoming my one and only spray paint. Oh, and make sure to give those plates a good cleaning with soap and water before you start (also learned that one the hard way!)

Then, I suggest you make a template on the wall. Check. Now, this is generally the obvious, smart thing to do. But folks such as myself also need to learn this one the hard way. I figured just a hole here, a nail there. It can't look that bad, right? Ha, ha...not so. When hanging a grouping I've learned its terribly important to map it out, and measure it. The hours I spent this afternoon filling and puttying holes is proof! So the dear Hubbo came to my rescue (well, actually he was probably a little shocked at the disaster I was making of our freshly painted walls). He forced me to make a map, well more like strongly suggested, "If you don't do this, I'm not helping you..." Convincing! This is the backside of Christmas wrapping paper taped to the wall.
Then it came time to start putting the nails in. The first grouping was unfortunately too high, so in addition to filling my disasterous holes, I also had to fix the first grouping of holes. But we finally got it to the right height, and I'm so pleased with it.

The lovely Nepper plate wall.
Now the plate below may have had some value, but it did have two significant chips in it. So figuring on that, I painted it anyway. Its by J&G Meakin, and based on the stamp it looks like its from the 30's-40's. I searched and searched trying to find information on the pattern, but couldn't find anything. I think it has the prettiest lines of all the plates. I'm glad I used it.
I think the triangle shape goes pretty well with the cut out to the stairwell. It adds a little character and charm to the space.
I also had to share these few pictures of my china haul a month or so ago. I had really wanted to use real tea cups for Abbi's birthday party (the theme being "Royal Tea Party"), but at every second hand store it was at least $5 for a tea cup and saucer. But I stumbled upon this lady's china collection at a g-sale one Saturday afternoon. I casually asked how much, expecting it to be more than I was willing to spend. Instead she said $5 for 5 tea cups, saucers, and the coffee pot. Gulp. $5 you say? Sold! She sold me the two bottom plates for 25 cents each (the one on the bottom right being the J&G Meakin plate). I spent a total of $5.50 on all of this gorgeousness! I love all of it, and now now have some incredible beginnings to a tea cup collection. Awesome score.
She sold me the coffee pot for only $1 because the knob is broken off the top of the pot (which I didn't even notice until she pointed it out). A beautiful Royal Albert coffee pot for $1. Normally in the $70 range.
This saucer is also made by Meakin, but this time the brother (Alfred, I think). I absolutely love this pattern and will definitely be keeping my eyes open for some additional pieces. Its called Renaissance. So classic.
So that's the plate wall. Another project made possible by my dear husband. Truly, you should hire the man if you need something hung. Perhaps that could be a new business plan.
"Nepper's Hangings." Ooo, I can see it now...

Saturday, August 15, 2009

Smokey Applewood Pulled Pork Sanwiches

I've got another great recipe to share. I tried this one out two nights ago, and it was a hit. I have my inspiration binder that I keep magazine articles, pictures, paint chips, and even recipes that I would like to eventually try. I've been working my way through all of the recipes. Some good, some not so good. This one turned out to be great. So quick and simple, and super delicious!
Smokey Applewood Pulled Pork Sandwiches.
"Inspired by Compliments"
(Sobey's Publication). Winter 2008.


Prep Time: 15 mins.
Slow Cooker Time: 8 hours
Serves: 8

Ingredients:
2lb. (1kg) boneless pork shoulder roast, string removed & trimmed of excess fat*
1 Sweet Onion, sliced*
1 Granny Smith Apple, peeled and sliced
1 Bay Leaf
2.5 C (625 mL) Compliments Beef Broth, 25% Less Sodium*
1/2 C. (125 mL) Compliments Sensastions Smokey Bourbon Applewood Grilling Sauce*
3 Tbsp. (45 mL) Tomato Paste
2 Tbsp. (30 mL) All-Purpose Flour
1 Tbsp. (15 mL) Chili Powder*
1 Tbsp. (15 mL) Worcestershire Sauce
2 Cloves Garlic, minced
1/2 Ts.p (2 mL) Pepper
8 Whole Wheat Buns

Directions:
1. Place pork, onion, apple, and bay leaf in slow cooker. Whisk together broth, half of the grilling sauce, tomato paste, flour, chili powder, Worcestershire sauce, garlic and pepper. Pour into slow cooker. Cover and coook on LOW for 8 hours* or until pork is tender and cooked through.
2. Remove any excess fat that has risen to the top and discard. Remove pork to a cutting board, cover and keep warm. Transfer liquid to a saucepan and bring to a boil over med-high heat. Reduce heat and simmer until thickened, about 15 mins. Add remaining grilling sauce and heat through. Remove bay leaf.
3. Shred pork with 2 forks and combine with sauce. Serve on whole wheat buns.

Nutrition Info:
Per Serving:
540 Calories
34g. Protein
25g. Fat
45 g Carbohydrates

*So like any of my recipes, I made a few adjustments. This is a Sobey's recipe, so they obviously want you to use their product. I didn't. I used a bouillion cube and some water. I used BullsEye BBQ Sauce, and it still turned out great. I also didn't have any chili powder on hand. Oh, and I couldn't find a "sweet onion" for the life of me at Safeway, so I just used a plain 'ol onion. I also used a small pork tenderloin instead of a roast. And finally, my day was fairly kid crazy, so I didn't manage to get this on until 1:00pm. So I left the slow cooker on high, and it was done beautifully by 5:00pm.

Truly, this one is a keeper. So simple, cheap, and delicious. Give it a try tonight!

A shot of the Hubby. Thinking "just let me eat the darn thing already!"

Friday, August 14, 2009

Road Trip Tales: Part 4

The final segment of our summer road trip tales is finally here. I know you all have been anxiously waiting, right? ;)

For our Thursday evening, we spent it at the Tait's house. Dear friends for what sometimes feels like forever. We have many fond memories on their couch (pre-kids) spending all evening there. We had a great time, and Abbi loved being around all the kiddos. She especially adored Bella. Again, another awesome BBQ, this time Salmon. It was incredible food. For dessert, ice cream, obviously. Its a rare night spent at the Tait's without some ice cream. And it was even better considering how hot it was, again!

Abbi would have followed Bell to the moon. She adored her. And yes, a cute bum shot!
The Tait clan. Eli chowing down some butter, er..I mean corn ;)
The kids eating ice cream, and Gabe trying to nab some.
On Friday, we stopped by the Bay, where my Mom works. A chance for my Mom to show off two of her three Grandkiddos.

Making up schedules with Joan.
Abbi even got her own Bay name tag. Probably the cutest Bay employee on record!
A shot of my Mom and I. Can't you see the resemblance? ;)
We left Nanaimo on the first ferry Saturday morning. We made reservations because there was no way I was wasting any more time in a ferry terminal. We made it on, and we even got to ride the new ferry - Coastal Renaissance. I'm quite glad it worked out that we got to go on it. More for Rob's sake than anything. A boat is a boat to me. For the record...its a nice boat :)

Some pictures from our ride...
We reached our destination, Kelowna, around Noon. We spent the night with the Brown's and the McArthurs. It was lovely. So relaxing, and we felt so pampered while we were there. Another hot, hot day, but the house had air conditioning. They cooked us up another great meal - steak, freshly caught crab, and some incredible soup that Layna put together. Probably the best soup I've ever had. So many dimensions, so much flavour. Mmm, delish! There were also garden fresh baby potatoes with our dinner, and in the morning we had peach crepes made with freshly picked peaches. Sooo good! That night after both kids went to bed, we sat out on the patio, with a view of the lake and just chatted over dessert. I'm so glad it worked out for us to stay with them, it was so refreshing to be with old friends. Good visit!

The fabulous view of the lake. Slightly smoky mind you, but a view nonetheless!
Gabe getting snuggles from Christie.
Abbi adored Layna. They were best buds while we were there.
Gabe getting snuggles, this time from Layna & Matt.
All the pups, Coco, Zica & Kiki. I wish I could have taken them all home with me!
Finally here are just a few pictures from our drive home. It was a long day. We left Kelowna around Noon, and arrived in Edmonton (at home) 12 hours later. The kids did pretty well. We had a slight melt down about 1 hour away from home, but at that point you just grin and bear it and get to your destination. Especially when its pouring buckets and there is a hail storm raging. Yeah, you could say we just kept on driving.

Some mountain shots...
The Three Sisters. Banff, AB.
That's one giant chunk of rock missing there...
Yup, we nearly drove right into that down by Calgary. Thankfully we took the by-pass route and I think we missed the worst of it (this is the storm that caused quite a bit of damage in the Carstairs area with large hail).
All in all, it was a great time away, but like any vacation, coming home also has a sweetness to it as well. It felt a bit too short, especially for Rob, who really only had one week away from home. Regardless, we are glad we did it. The kids fared quite well. We got some hot, hot heat (maybe a little too hot!). Some incredible food. And had a great time with family and friends. Thank you to all who hosted us, fed us, made the effort to see us, and ultimately loved on us!

Thursday, August 13, 2009

Pie Anyone?

OK, OK, so maybe I'm not the kind of girl who can stick to a series. I promise, Part 4 will come soon, but I just had to post these recipes. It all started with Rob's Mom giving us an ice cream pail full of Saskatoon Berries (Serviceberries for you American readers). Then a lovely lady here in our neighborhood has been hooking me up with rhubarb all summer long. So what does that mean? Pie, pie and more pie.

I had it in my head that we should cook 5 pies last night. The No-Fail Pastry recipe from my cousin Ruth, which is originally from my Aunt Jean, makes enough pastry for 5 pies. I mean, who can't whip off 5 pies in one evening? Seriously people...its a piece of cake (er, pie)...right ;)

Earlier in the day, Rob shared the fact that I was baking 5 pies at the lunch table. He also happened to mention they would be Saskatoonberry pies. Well, I guess one of the guys he works with is addicted to the stuff, and promptly put $20 down on the table for two of the pies. OK, um, no pressure...

Now I'd say Rob and I are apt pie bakers, but for some reason, last night our combined culinary skills last night accounted to zero. It was about 7:00pm when we decided it was high time to start (actually that was Rob, I was not at all in the pie-baking mindset yet so I was slightly annoyed by his pie baking gung-ho-ness). Rob wanted to be done by 9pm. Hah. So I started cutting rhubarb. Then I started working on the Saskatoons, which are a huge pain the butt to clean, might I tell you! Rob was working on the dough (the children were entertained by a movie at this point).

Then I decided I really wanted to try out a peach pie recipe that I had clipped a few weeks ago. So off to Safeway Rob went. He somehow forgot the part of the earlier discussion where I specifically didn't buy my peaches at Safeway earlier in the day because their selection was awful, and way too expensive. So 30 minutes later Rob proudly returns with the peaches I specifically didn't want. Oy. I had to leave the room I was far too annoyed by this point.

Rob gets back to his dough, only to discover that we are out of corn starch. So that was it. Off I went to Sobey's. I was buying my damn peaches (pardon the French), and getting the corn starch. It was already such a gong show I think I was nearly in tears when I couldn't find the corn starch. Finally I went up to some poor unsuspecting stock boy and begged him to find the corn starch for me. "Well, it should be down aisle 4." "NO, you don't understand...I NEED you to show me where it is, because after 15 trips up and down that aisle I cannot find it." The stock boy obliged the crazy, frazzled, peach pie making, stay at home Mom. He did find it. Thank you, thank you so much. Really only if he understood. I also was able to find a way better deal on much nice peaches. 10lbs for $10. Nice.

I returned home. Rob had put Abbi down, and had his filling finished, and just needed the corn starch for the pastry. It was nearing 9:30pm by this point. Oh, and did I mention what Gabe was doing for most of this? screaming. Oh yes, was he ever screaming. He is teething right now, so he could only do so long in his exersaucer. So for most of this he was on my hip.

Finally, the pies are in the oven, ready to go. They start smelling delicious. Then it occurs to me, we are using the only two pie plates we own to bake these pies for Rob's co-worker, so I actually have nothing to cook my pies in. Um, how did no one think of that? Then Rob suggests I make tart sized ones in my over-sized muffin tins. Hmm, good idea. OK, I'll do that.

Then I peek in the oven...only to discover Rob's "filling" has "fallen" all over my oven. I mean all over. So we get them out. They are looking quite good (minus the filling explosion). Then it occurs to us, we will have the fire department here if we attempt to cook anything in that oven. So it needs to be cleaned before anything can be cooked, and at now 10:00pm, no one is cleaning an oven, especially not when its sitting at 350 degrees (although I will say Rob was quite determined to try, because I think he knew I was bordering on a meltdown, all for a peach pie!)

So in the end...I didn't get my peach pie craving filled. Last night anyway. This morning I was up first thing, doing what I could (without using oven cleaner or the self-clean option) to get that bloody oven clean. I was eating my "Damn Peach Pie" come hell or highwater. And I did. I had my little tartlet, and it was so delicious. Perhaps a little more drama than necessary for a piece of pie, but boy was it good.

So with no further ado, here are the two pie recipes, and here are my suggestions before you attempt baking either of these pies:

Check your ingredients are all stocked
Communicate clearly with your partner about all relevant pie info
Make sure all screaming children are otherwise happily occupied
Put a tray lined with tin foil under your pie plates
Use tin pie plates, or at least make sure you have enough pie plates
And prepare yourself for the most delicious tasting pies ever!

Saskatoon Rhubarb Pie
www.allrecipes.com
Submitted by STACYSUBSCR

Prep Time: 20 minutes (Ha, ha, oh my, I'm rolling on the floor over that one!)
Cook Time: 50 minutes
Serves: 12
Oven: Preheat to 400 degrees F

Ingredients:
2 (15 ounces ) packages refrigerated pie crusts (What a novel idea!)
2 C. Chopped rhubarb
1/2 White Sugar
1/4 C. Cornstarch
2 Tbsp. Lemon Juice
1 C. White Sugar
4 C. Fresh Saskatoons

Directions:
  1. In a microwave-safe dish, combine the rhubarb and 1/2 cup of sugar. Heat at full power in the microwave until rhubarb is soft and juice is pooling in the bottom of the dish, 4 to 5 minutes. Drain off the juice into a measuring cup and add enough water to make 2 cups. Dissolve the cornstarch in the liquid.
  2. In a saucepan, stir together the 2 cups of liquid, lemon juice and remaining 1 cup of sugar. Add the saskatoon berries and rhubarb; cook over medium-high heat until thick and bubbling, about 5 minutes. Pour into the two pie crusts. Top with the remaining crusts and cut holes in the top to vent steam. Pinch the edges together to seal.
  3. Bake for 15 minutes in the preheated oven, then reduce the temperature to 350 degrees F (175 degrees C). Bake until crust is golden brown and filling is bubbling, about 30 more minutes.
Nutrition Info: (per serving)
Calories: 468
Total Fat: 21.8g
Cholesterol: 0mg
Sodium: 339mg
Total Carbs: 65.2g
Dietary Fibre: 3.9g
Protein: 4.5g

Damn Peach Pie (formerly known as Streusel Topped Peach Pie)
(I actually re-named this one! It was only fitting!)
Exmonton Examiner: July 29, 2009. Simply Delicious Column.
Diana Norminton

Ingredients:
1, 9" unbaked pie crust
5 C. sliced ripe peaches
1/2 C. Sugar
1 Tbsp. White Flour
1/2 Tsp. Cinnamon
2/3 C. Brown Sugar
1/2 C. White Flour
6 Tbsp. Butter

Directions:
1. Preheat oven to 425 Degrees F
2. Place sliced peaches in large bowl. In another bowl, mix 1/2 C. sugar with 1 Tbsp. white flour, and 1/2 Tsp. Cinnamon. Sprinkle over peaches and gently stir.
3. Spoon peach mixture into the prepared pie crust.
4. In a medium bowl, mix brown sugar and 1/2 c. white flour together thoroughly. Cut in butter into the brown sugar mixture with a pastry cutter. Sprinkle mixture over peaches.
5. Bake in oven for 30 minutes or until topping is nicely browned. Remove from oven and cool.

Anyway, after all that drama, I'm sure you are hesitant to go bake these pies, but I promise, or at least, I hope, they will be much less dramatic in your home. And even if it is a bit of an ordeal to cook them, at least they will be delicious!