


Showing posts with label Organizing. Show all posts

Monday, May 13, 2013

Favorite Thing #73: Functional Closets

OK, so here's the thing, I am a strong believer in having functional closets. Like seriously. If it could be a religion, I would probably join. It just makes so much more sense to have a closet be functional, rather than a pile of stuff jammed behind a door. Now I am slowly working to practice what I preach in this department. We now have 3 out of our 5 closets re-done. Apparently its a small obsession of mine considering I have posted about closets so. many. times. on this blog. Oy.

June 2011 was my first attempt at a re-do on the front closet. Then there was that time in July 2009 when we re-did the linen closet. Or in June 2009 when Abbi's closet got an overhaul. Yup. I think its safe to say I have a closet obsession.

Now if you will recall, our front closet has had some decorating love over the years, each attempt getting it closer and closer to being what I wanted it to be. But to be honest, considering the picture below is what we started with, I'd say anything was an improvement. The top of our teeny little shoe rack wasn't even functional after that time Rob tried to use it as an ahem, foot stool. Hence why pretty much all of the shoes are just piled on the floor. Ick.
Plus, I knew when people came over, they would be really curious about which cleaning products I used, so I was being really courteous by displaying them for all of our guests to see. So thoughtful of me.
Ugh. Anyway, needless to say, it was a sad scene.

Not to mention the prison gray paint color that dominated my front entrance.
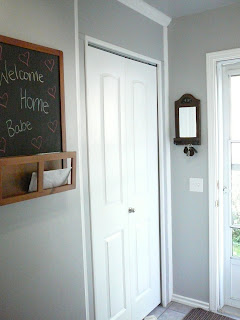
But after a weekend of some hard work and lots of finicky stuff, we finally got the front closet up to par and I am no longer ashamed of this little hole in the wall. Not only is it functional, but it is terribly pretty!

Seriously. I am IN LOVE. This is precisely what my front closet needed.

So first off. I must say I am a big fan of mistints. A mistint is a tin of paint that was either mixed incorrectly or the wrong finish or just plain not up to the customer's standards. Most home hardware type stores sell them. I have seen them at Lowes, Home Depot, Canadian Tire and Rona. AND its where my paint hoarding obsession began. I mean really, who can pass up a tin of paint for $1.25? Well...maybe you can, but I certainly can't. And the best part is that the color is almost an exact match to the kitchen paint color, which meant I could save the leftover kitchen paint for any future touch ups. Even better, this paint was a dream to work thanks to the primer and paint in one! Plus, I still have a little bit leftover to do any touch ups in the future.

The first step was figuring out of a way to maximize the space above the ClosetMaid Cubical storage units, so we picked up some white shelving and a few brackets and installed them. These shelves mean that we can now store both of our gym bags up there, plus our yoga mats, plus Rob's lunch bag, plus a few little extras. I am amazed how adding one little shelf increased the functionality of this space so much. 

The ClosetMaid unit really is a genius invention. I was able to pick up two more of the brown bins so it now looks complete, only took me two years to finally get on that, eep! It is honestly unbelievable how much storage these little units provide. I thought I would post a few pictures of just how much I can store in these little suckers. They are worth every penny! One of the top bins is full of dog items such as leashes, brushes, nail clippers, etc. The the other bin is just random stuff that I have to return to a store or to a friend. Below those is a bin of plastic grocery bags, reusable shopping bags, an entire bin devoted to my scarf collection and one more bin for my winter gear (toques, mitts, hats, etc). Beauty.

The lower unit is devoted to kids items. So we have a unit of outdoorsy summer stuff, chalk, toys, hats, sunscreen. Another bin full of sweaters for the kids. One for splashpants and outdoor gear. Then they share a mitten/toque drawer. And then a bin for each of their shoes. Seriously amazing right? So much stuff, neatly stored in such a small condensed space. Its my happy place.

Because Rob had to adjust these units to fit into this space, we are not able to use bins in the end cubbies. Regardless, it works perfectly to store all of my cleaning products. I suppose if a guest was really curious what products I used, they could still check it out, but at least it looks a lot more tidy and discreet than it did before.  
 
Next, we needed a more functional shoe rack. After our first epic shoe rack fail, we had two bamboo racks, double stacked, but over time pieces broke and they were barely standing upright (and no, Rob did not attempt to use these ones as a shoe rack). So those had to go. My cousin had given us a white shelving unit quite awhile ago now. It was in Gabe's closet. But recently I was in Value Village and found the exact same unit...for $12.99. Um, hello shoe rack fate! So we started out with three units looking like this (there is a third tall unit that is not pictured here). I saw the potential. The husband grumbled...

Thankfully, with a little (not-so-subtle) influence from the wife, he was eventually convinced. Carpenter husband to the rescue! He shortened the units and added a few shelves to make them more functional. We even made the spacing between the shelves on one side a bit higher to accommodate his shoes. Talk about custom made!

About a month ago I had picked up this large woven basket at my fave MCC thrift store for $5. I wasn't exactly sure what I was going to do with it, but like paint, its rare that I can pass up a good deal on a basket. Thankfully this basket found a perfect little home. Its the perfect width and depth. Basket love! It now houses the kids backpacks.

OK, so I am honestly most excited about these three little flower hooks. I picked these up years ago. I think for 10 cents each at a garage sale. I loved them, but again, had no idea what I was going to do with them (there's a bit of a theme going on here...). Fast forward a few years and voila, they have found a happy little home in my front closet! The spacing needs to be readjusted, but I put putty over the screw hole and painted the centres to match the wall color. They add a little fun to this space! They make for excellent purse and umbrella storage. Plus, if Rob ever decides to take up the man purse, he'll have a hook waiting for him. 

In terms of coat hooks, we had a total of 8 hooks going on previously, but it got quite cluttered once it was all filled up because they were so close together. This was the perfect opportunity to put to use some hanging apparati that I had also scored from my cousin's house. I am a fan of pure white trim and moudlings, so I added some white paint to spruce these up a bit.
 Rob had to reinforce them as they were not meant to be used for such heavy items, but with a little putty and paint and man love, they look like they were made for this space! I was also able to hang some cute art that I had picked up at Bargain Shop years ago now. I love the sentiment of these and have been meaning to hang them somewhere. This turned out to be the perfect spot for them!

The final touch for this space was finding something that we could hang on this white panel on the outside of the closet, above the bi-fold door. We are now discussing putting in a faux transom window here with an old barn window frame, but in the meantime, this "N" that I picked up at the thrift store for 50 cents with a splash of white paint works perfectly!
So there you have it, a front closet makeover Nepper-style. We are thrilled with this space and its always so rewarding to see a space that used to cause grief and frustration turn into something that is user friendly AND pretty!

Tuesday, September 25, 2012

It all started with...(Part II)

Alright, I assume if you've made it to Part II, you suffered your way through Part I. I salute you. Its no easy task spending a day in my head. Let alone 30 years! One friend said she had vertigo after reading my last post. Come now, is it really that bad? OK, I realize I am a bit neurotic, I don't deny that, but at least I'm neurotic in my decently organized home. One of my most favoritest things in the world is finding a functional home for something. Almost better than Chocolate Chip Mint ice cream...almost.

So if you will remember, we left off with the IKEA GORM shelving unit. These are great (and cheap), but they are only useful for big oversized items. Hm, what excess of big, oversized items do we have in our basement? Tools of course! My husband has a spectacular assortment of tools. I know, I know, he's a carpenter, but seriously, it boggles the mind how one could need so many different tools. That said, those tools have finished my basement, built closet organizers, swapped the tires on our vehciles, etc, etc. So I try not to complain about the tools (too much), but I also need them to be stored in an orderly manner.

(E). So with this newly emptied GORM unit I was able to get all of his tools off of the floor. This is exciting news. While I was away on the Island, he sold his big red tool box and replaced it with a Fat Max rolling tool box (easier to take to jobs) and two Rubbermaids. I actually think they are perfect tool-room storage. But there was still the issue of wasted space (height-wise). So with some ingenious swapping, moving and plenty of grunting (on my part, those suckers are heavy), I got everything in its place and it looks much better. 
 
If you'll notice that storage unit to the left, it is vintage IKEA. My cousin gave it to us probably about a year ago now. She said she bought it 20 years ago. First of all, I love that in big cities like Edmotnon, IKEA even existed 20 years ago (I probably only heard of it in the last decade), that it is an still incredibly well-built piece that is functional and intuitive, AND that she's kept it in such good condition! Oh...and that she gave it to me. I say who needs friends with benefits when you've got family with storage units. OK, so I don't really say that, but anything storage related makes me pretty happy. 
 
So this beloved cousin of mine is moving out West in a few months and needed to do more purging and in the process gifted me with 3 more IKEA storage units! And yes, she's at the top of the favorite cousin list right now.

(F). So these new-to-me IKEA storage units meant that my side of the craft room could finally get some organizational love. And yes, the room is most definitely divided into his and hers. We're cool like that. No blurring the gender lines around here. 
 
I recognize its not the prettiest craft room with its concrete walls and plastic insulated walls. Martha Stewart won't be popping by anytime soon. BUT, it is organized, and that makes me happy enough for now. Although "finish the craft/tool" room is on the to-do list. My to-do list anyway. 

So I look the three cabinets and stacked them on top of each other. This makes the best use of the height and our msucles (that sucker is HEAVY!). The white cabinet was part of the bedroom set that I bought for Abbi a few years ago (a whopping $20 for a MALM bed,two dressers and this cabinet). Also old IKEA. Also in fantastic condition. Score.

- White cabinet. Now holds all of my fabric. Meaning I have an empty Rubbermaid bin, and I can now actually see all of my pretty fabric in one glance. Fabric love. 
- Our painting supples were previously stored like this. Ugly x10.
 
- Bottom Cabinet. Now holds pretty much all of our painting supplies. One might say I have A LOT of paint (eg. my husband), but I like to say that I have a lot of options. The middle cabinet holds any extra painting supplies and I think we will move the husband's drywalling tools into the empty side. You just never know when you might need to patch a hole, move a painting, or a curtain rod. Life is just too uncertain to not have drywall tools easily accessible.
Next we move to the large storage unit. This isn't as pretty as I would like, but it is currently housing A LOT of stuff. 

- Because I was able to move all of the paint into the cabinet, the paint bin was now empty so I decided to use it for some of my kijiji items. You should know, I sell A LOT of stuff on kijiji. Like I probably have, on average, 20 items for sale at any given time. Its a little crazy, I know, but its such an easy way to make a little extra cash. So the bottom two shelves are devoted to kijiji items. This gives them a place to go and ensures that my sewing table doesn't have to look like this anymore...
Now I have my happy little kijiji shelves. 
 
 - I love that this shelving unit has two drawers. Genius. This meant that my 4 junk drawers in my overflowing rolling storage unit could now be condensed. And did I mention that I love having all my lightbulbs in a drawer? I know, I am a bit neurotic, but did you know that all of the CFL bulbs have a warranty and if they burn out before that time, you just mail in a copy of your receipt and the UPC and they send you a new bulb? Its genuis. Since our initial lightbulb purchase back in 2008, I haven't had to buy a single light bulb. But I digress...
- Next is my scrapbooking shelf. I don't really scrapbook. I have scrapbooks. I have paper. I have pictures. But have I ever actually done it? No. I get invites, a lot, to parties, but it has yet to peak my interest. So in the meantime, I have all my supplies on a pretty little shelf. The day will come, I just know it. 

- Next is my sewing/beading shelf. It now houses my sewing machine and all my sewing goodies. Of course some cute baskets were required, so I had to do some rearranging to make this happen. 
- Next shelf, also required cute baskets. I had scored these at Zellers a few years ago now. They housed my tea towels upstairs (which are now in the 9-drawer dresser), so this empty basket came downstairs. The other one is still housing kids bike helmets and skates, although I want some hooks in the recycling closet for these items, as this is where the kids bikes will go for the winter. 

The other basket houses all the gifts I have squirreled away over the course of the year. Some for birthday parties. Some for Christmas. And some just because. When I see a good deal, I generally make a point to stock up, especially for kids birthday parties. If you'll note, this is near the top shelf to keep it away from little Nepper children's eyes. Gabe spotted a Lightning McQueen Christmas ornament (meant for him), and hasn't stopped talking about it for like 2 days. Sigh. 
- The top shelf has a baby bassinet. A kijiji item. Seriously people. These things cost $59 brand new and I am asking $15. No bites. No idea why. Because I am an opportunist, I saw this at a garage sale for $3 (also a shockingly low price), so even if I sell it for $10, I made a fairly rockin' profit. 

On the other side are two bins. One houses all of my gift bags. I have an impressive collection, ranging from baby showers, to weddings, to birthdays, to you forgot this at my house and I want to give it back to you in a pretty bag. You just never know what you might need a bag for.

The other bin houses all of my tissue, gift wrap and bubble wrap. Also on the top shelf as it seems my children are magnetically drawn to bubble wrap. No matter how many times I try to explain that the popping renders it useless, I still catch them pop pop popping it.   

- So I am left with this sad little corner. Two basically empty storage units and my gift wrap container. So I'm not sure how to break it to the husband yet, but I'm thinking the white cabinet will actually go here and we will hang two shelves that he picked up from a worksite a few years ago. They can house ribbons and other sorts of cuteness. I may keep one storage unit, but they honestly don't hold much other than phone books and large mailing envelopes. Oh, plus all those momentos that I plan to scrapbook one day...
(G). So this leads me to my last and final major project. A new couch. This probably has nothing to do with the $5 chair upstairs, but it all just seemed to domino from that point. I have been looking for a hide-a-bed sectional for our basement since we finished it, back in 2010. I wanted seating, but also something that could double as a guest bed. These go on sale for $1099, but I picked this up for $500 off of kijiji. Plus, Rob and his (way-too-kind) friend helped move it in, so delivery was free (minus the nachos and beer I paid them with).

The stars finally aligned and I got my sofabed sectional...
I AM EXCITED ABOUT THIS.

They are in excellent condition. They are brown microseude. And they are most definitely man cave couches. They have two Lazy Boys. Two of the chairs massage you while you watch TV. The armrests lift up to reveal cup holders and TV remote storage. And finally, if that wasn't enough...you can actually connect your phone line to the centre chair's armrest and answer your phone. Um...seriously? The only thing missing is a beer fridge (but don't mention that part to my husband, he doesn't need any more ideas).

- So we had to move our TV, which looks a bit awkward and may mean we eventually have to get a new stand, but it works for now. That wall still needs to be finished, but heck...I have a relatively finsihed basement. Yippee!
- This also meant that the futon can go (still waiting for someone to pick that sucker up off of kijiji) and that our green couch had to be cut in half to get it out. But who really cares? I have a nice sofabed sectional AND...a fairly organized house. 

- I do need to come up with something for the walls for this room, which has remained artless until we had the couch that we were sticking with. You get a bit sensitive about putting holes in walls when it was you who helped put them up and mudded and sanded, and mudded, and sanded. 

- This organization spree has also led to a major reorganization in our bedroom but that one won't be done for awhile yet. Pretty sure that one will have to wait awhile unil the husband recovers.

Rough estimate of the cost of this ridiculously, time-consuming, yet surprisingly satisfying, overhauul of my home...
$593.49

Phew. I'm exhausted. Anyone else?
 

Friday, September 21, 2012

It all started with...(Part I)

A chair. This chair to be exact. This $5 dollar chair, to be even more exact.
Yes, this chair cost me $5. It is my best find. Ever. There are a few things you need to know about this chair.  First thing...it matches the brown pleather couches that are already in our living room.
Second thing...its actually in better condition than any of our brown pleather. And the third thing...seriously people, it was $5.

 So what did a  $5 chair start you ask? What follows is a little glimpse into the mind of Miss Nepper herself. Prepare yourself. After the shocking tale that is about to follow, you should do two things:

Thing #1. Say a prayer for my poor husband.
Thing #2. Know that I am by no means done. It never, ever ends.

So the last two weeks at Nepper's Landing have gone a little something like this...

(A). This new $5 chair led to a major living room reorganization. It took us an entire weekend to figure out an arrangement we could both agree on. We finally got it. Which led to...

- My previous centred wall art no longer works due to the off-centered arrangement of the furniture, meaning I need something new. In the last few weeks, I have found a total of 3 burlap sacks which I am thinking I will frame and centre on the wall. Now I need to find three similar sized frames to use for this.
 - This also meant we no longer need our side tables. A. Because they do not fit. B. Because I never really liked them in this room anyway. So I put them up on kijiji and sold them both for $25. Cha-ching.

- This new piece of furniture also inspires me to have more pillows (I love pillows), which means I need to make new cushion covers. I got two of these covers for 25¢ each. I love, love, love the fabric. Now I just need to make them smaller for the two pillows I have.  
 
(B). Next, while at my new MCC thrift store two weeks ago, I stumbled across this 9-drawer dresser. Something I have been wanting for my living room for since forever. And, because I had a 50% off coupon, this piece cost me $17.50. Sure, its rough around the edges, a bit bumped up and missing a lot of hardware, but it has fantastic lines. And until I find the time in my life to treat it to a new paint job, it shall be considered shabby chic. So this new dresser led to...
 
- The removal of a a mini-bookcase from our living room (which housed all the kids craftt items). This mini bookcase is now located in Gabe's closet. This meant that all the kid's craft items were moved into the dresser. There are drawers for coloring, coloring books, puzzles and PlayDoh/painting items. Of course one can't just simply these items in a drawer, they need to be in cute little bins. Thus, a trip to IKEA was required.

- This also meant that all my washcloths and tea towels can fit in the centre drawers, so that emptied the basket that was in the cupboard under my china cabinet. Now I had an empty cupboard as well as an empty basket. 

- This empty cupboard meant that our additional kitchen gadgets could move out of the basement pantry and come upstairs (eg. Crock Pot and food processor). This also made me realize we have two juicers, and I only use one, so I will sell the gray one on kijiji for $20.
 
- The drawer space in the 9-drawer dresser for PlayDoh meant that I could now remove the fabric bin from the top of my fridge, which previously housed PlayDoh. Which means more room for cereal boxes and less clutter on top of my fridge and an empty fabric bin.
 
- The top of the 9-drawer dresser was able to house a lot of my decor items that have been stuck in a bin in our under-stair storage for years. 

- The removal of extra drywall pieces that were sitting on the wall where the 9-drawer dresser now sits (see below). The husband jokingly called it abstract art. Hilarious. Not. 

(C). Over a month ago now, I got two IKEA Billy bookcases through a friend of a friend. $25 each. Half of the price that you would pay to get them new at IKEA. They had been sitting in an unfortunate state. No design. Just a jumble of junk on shelves. So when I opened up my decor items bin for the top of the dresser (see above), I was inspired to actually make these bookcases presentable. This led to...

- The genuis idea that we should move the books from our bedroom bookcase to the bookcases downstairs. Beyond housing books, its main job was to collect dust. Our book collection was rarely noticed, let alone perused. So in a three-story townhouse this led to a lot of trips up and down the stairs. And I'd like to think a lot of calories burned! This also led to a great book purge.

- Next I was able to empty the home decor items bin as everything pretty much fit on the shelves, so that means I now have an empty Rubbermaid bin. I decided to alternate books and pretty. I am too utilitarian to devote an entire bookcase to decor, but I figure if I did half and half it would be easier on the eyes. Which it is. See picture below.
 
- I now had an empty bookcase (from our bedroom).

(D). While our pantry was somewhat functional in that it held extra or oversized food items, it wasn't the most efficient storage. We had a big IKEA GORM shelving unit in there which wasn't the best use of space for small items like cans and jars. Plus, thanks to the newfound space in my china cabinet upstairs, I had an empty  shelf on my IKEA shelving unit (because the Crock Pot and food processor went upstairs). This led to...

- The realization that this now-empty bookcase would be far more suitable for smaller items like cans and jars and would fit quite nicely in our pantry. See picture below.
- This meant the drywall that had been sitting on the wall where the 9-drawer dresser now sits had a place to go. So the husband hung up the extra drywall pieces in the pantry. It isn't finished, but heck, it has walls.

- These makeshift walls now mean that we can finally hang the 6 shelves that I picked up at a garage sale two years ago for any additional food items. 

- That we finally had to move the boxspring that had been hiding behind the IKEA shelf in our pantry for years. This was put on Abbi's bed to add support and make it a little higher off the ground. (Note Abbi's new IKEA duvet cover. I love it and think its so fun for a little girl's room. $12.99 at Value Village).
- The pantry now having walls made the room feel a bit smaller and we no longer had the IKEA unit to store the paper recycling bin, so that got moved to the closet beside, which now makes so much more sense. Now we have bottles and paper recycling side by side. Eco friendly heaven. Though I am thinking we need a small shelving unit here so we could have two recycle bins.
- This empty GORM unit led to...

OK, OK, I will stop there for the day. If you are not a multi-tasker, I'm sure your brain is fried just from reading this. Reading it all out now, well, I think I may just be half-crazy, but well, in some small way, it does demonstrate that there is a method to my madness.

Part II to come...

Friday, June 3, 2011

Sexy casings.

Can casings be sexy you ask? I like to think so. Mine are looking rather fine these days. I've been puttering away this week, getting the kitchen casings and baseboards all painted up, in a purdy semi-gloss white. The filling and sanding, and re-filling and re-sanding (those were the putterings from last week) was the dull part of the job. But the paint, ah yes, the paint. Paint never ceases to amaze me with its instant ability to transform something. While primed mouldings are "white" to some folks, once you put it beside a painted moulding, primed white just never looks the same. Its dull, its drab. On a few occasions in this house, the previous owners didn't take the time to paint their primed mouldings. Tsk, is all I have to say about that.

I have some pictures, although I'm still cursing this camera. I really do miss my old camera, but the $80 for a new battery is just a bit much at the moment. So forgive the grainy pictures. I did the best with what I could.

This fat little fellow is Herman, the ledge lark. First of all, I adore his fatness. Second, I adore that he is basically the exact same yellow that I painted my kitchen. And third, I have set him on this ledge with the most important job of watching out for ledge devils. Yes, you know the ones. My husband is definitely a ledge devil. His roommate of many years graced him with this name, because if there was a ledge or a surface, somewhere, anywhere, Rob would have to put something on it. So Herman's purpose in life is to give Rob "the stare" if he dare put anything on my beautifully painted ledge. He looks cute and unassuming now...
This little rosette is our door stopper, and it also gives a nice idea of what the white mouldings and the yellow wall color look like together. So pretty.
Rob finally hung my barn star, which I LOVE. I'm not exactly a fan of the cheesy little hanging loop thing at the top, but I think the black contrast looks smashing.
*And I have to say, I was fairly convinced I was going to paint the hutch this summer, but now that the walls are yellow and no longer prison gray, I'm not entirely bothered by the light wood look. I still think a shabby chic blue paint job could be cute, but for now, I'm much happier with my little hutch. It also seems to pop more now that the paint color is brightened up. I've had a lot of people walk in the house lately (it is the first thing you see) and ask me when I got the hutch. That would be 7 years ago people!

I'm nearly ready to put together Mama's command centre in the kitchen. I've been slowly picking up items to make this little space more functional. Not having a lot of counter space, most of our mail and other random junk ends up on top of the dishwasher. So I've moved our black filing cabinet into the corner by the window, stuck a letter tray on top, and I plan to hang a bulletin board (the same one I used in my office space downstairs), as well as this little letter sorter thingy above that. I picked it up last weekend at a g-sale for 50 cents. It had a horrid ivy motif going on, but with some sand paper and white paint, voila! A cute little spot to stick outgoing mail, coupons, and whatever else. Last weekend, I also found a cube organizer at a garage sale. I literally had it on my to-do list for later that day, as Zellers had them on for $50 (regularly $70). So I picked the exact same one up for $25 at a garage sale. I proudly brought it home, stuck in in the closet, and much to my dismay, our closet was not square. My husband says closets are NEVER square. Sigh, so all my measuring and figuring was all for nothing.

That is until I remembered the carpenter factor, and promptly set the husband to work. He cut about 1.5" off the end of the cabinet, put the end back on, and voila, it fits like it was made for our front closet. Brilliant. That means we won't be able to put a cute little fabric basket in the end cubbies (on the right side), but its a great spot for cleaning products, garbage bags, etc. I was so thrilled with it, I ran out to Zellers and bought another to put on top! So Rob did the same thing to that one, and now I have a total of 18 little cubbies in my front closet! I am in cubby heaven.
We still have a lot of work to do in the front closet, as we removed the two shelves, as well as the rod. There is much hole patching to be done, as well as a coat of white paint to freshen things up. Due to the lack of rod, we will put up hooks for people to hang their jackets, and the kids will each get their own little coat hook, at little people height. Eventually we will each get our own little fabric bin too, but I plan to pick them up slowly over time, as they are $8 a pop! 12 times $8...eep!

Finally, this is another exciting addition to my front closet, but to the exterior of it. This closet was clearly an afterthought or something. So above the door, we have this giant, empty panel. I really wanted to find a grate or scroll piece to hang up there, but at $20, it was far too much. I even checked out a number of salvage places looking for old scroll work. Couldn't find anything, but I did get this old shutter for $6. Its cute, its cheap, and I think it might just do the trick. Still not entirely sure what I'm going to do with it. The closet is such a brilliant white now with the paint, I think no matter what I do, this little fellow will pop. Shutter love.
As you can see, I've been a busy little bee trying to finish up this kitchen makeover, bit by bit, piece by piece. With every new addition, or change, or upgrade, I'm loving the results. Now the back splash stands to be the final big change, but in the meantime, I'm doing what I can to make it a little more like home.